Host Your Site for Free
A complete guide to deploying your website for free using Vercel and GitHub. From setup to custom domains, I'll walk you through every step.

Why Pay for Hosting When You Can Get It Free?
When I first started building websites, I spent countless hours comparing hosting providers, dealing with cPanel, and paying monthly fees for basic hosting. Those days are long gone.
Today, I’m going to show you how to host your website completely free using Vercel and GitHub. No credit card required, no hidden fees, and deployment that takes literally seconds.
This is the exact setup I use for my own portfolio and client projects. It’s fast, reliable, and scales automatically.
What You’ll Need
Before we dive in, here’s what you need:
- A website project (HTML/CSS, React, Astro, Next.js, Vue, etc.)
- Basic familiarity with Git (don’t worry, I’ll walk you through it)
- About 15 minutes of your time
That’s it. Let’s get started.
Step 1: Setting Up GitHub
If you don’t already have a GitHub account, head over to github.com and sign up. It’s free and takes about a minute.
Creating Your Repository
Once you’re logged in:
- Click the ”+” icon in the top right corner
- Select “New repository”
- Give it a name (like
my-portfolioorcompany-website) - Choose Public (required for free hosting on most platforms)
- Initialize with a README if you want
- Click “Create repository”
Pushing Your Code to GitHub
Now we need to get your website code onto GitHub. Open your terminal and navigate to your project folder:
cd /path/to/your/projectInitialize Git if you haven’t already:
git initAdd all your files:
git add .Commit your changes:
git commit -m "Initial commit"Connect to your GitHub repository (replace with your own URL):
git remote add origin https://github.com/yourusername/your-repo.git
git branch -M main
git push -u origin main
Your code is now safely stored on GitHub. Time to deploy it.
Step 2: Setting Up Vercel
Head to vercel.com and click “Sign Up”. Here’s the beautiful part: you can sign up directly with your GitHub account. One click, and you’re in.
Connecting GitHub to Vercel
After signing up:
- Click “Add New Project” or “Import Project”
- Select “Continue with GitHub” if you haven’t connected already
- Authorize Vercel to access your GitHub repositories
- You’ll see a list of all your repos
Importing Your Project
Find the repository you just created and click “Import”.
Vercel is smart. It will automatically detect what kind of project you have:
- Static HTML? It knows
- React app? Detected
- Astro site? Configured
- Next.js? Already optimized
For most projects, you won’t need to change anything. The default settings work perfectly.
Configuring Build Settings (If Needed)
If you’re using a framework, Vercel might ask about:
- Framework Preset: Usually auto-detected
- Build Command: Like
npm run build - Output Directory: Where your built files live (often
distorbuild) - Install Command: Usually
npm install
For a simple HTML/CSS site, you can skip all this.
Deploy!
Click the “Deploy” button and watch the magic happen.
Vercel will:
- Clone your repository
- Install dependencies
- Build your project
- Deploy it to their global CDN
- Give you a live URL
This usually takes 30-60 seconds. Grab a coffee, you’re almost done.
Step 3: Your Site is Live!
Once deployment finishes, you’ll see a screen with confetti (yes, really) and your live site URL. It’ll look something like:
https://your-project-name.vercel.appClick it. Your site is live on the internet. Just like that.
Step 4: Setting Up a Custom Domain
A .vercel.app domain is fine for testing, but you’ll want your own domain for a professional site. Here’s how to set it up.
Buying a Domain
If you don’t have a domain yet, you can buy one from:
- Namecheap
- Google Domains
- Cloudflare
- GoDaddy
I personally use Domains.co.za. They’re affordable and straightforward.
Adding Your Domain to Vercel
Back in your Vercel dashboard:
- Go to your project
- Click “Settings” → “Domains”
- Enter your domain name (like
mattwalton.dev) - Click “Add”
Vercel will give you DNS records to add. Don’t panic—this is easier than it sounds.
Configuring DNS
Log into your domain registrar (wherever you bought the domain) and find the DNS settings. You’ll need to add records that look like this:
For apex domain (yoursite.com):
Type: A
Name: @
Value: 76.76.21.21
For www subdomain:
Type: CNAME
Name: www
Value: cname.vercel-dns.com
Save these changes. DNS propagation can take anywhere from a few minutes to 48 hours, but it’s usually fast (under an hour).
SSL Certificate (HTTPS)
Here’s the best part: Vercel automatically provisions an SSL certificate for your custom domain. No configuration needed. Within minutes, your site will be live with HTTPS.
Free SSL used to be a pain. Now it’s automatic. This is why I love modern hosting.
Step 5: Automatic Deployments
This is where things get really good.
Every time you push code to GitHub, Vercel automatically deploys the changes. No manual uploads, no FTP, no clicking “Deploy” again.
Your workflow becomes:
# Make changes to your code
git add .
git commit -m "Updated homepage design"
git push
That’s it. Vercel sees the push, builds your site, and deploys it live. Usually in under a minute.
Preview Deployments
Even better: every branch and pull request gets its own preview URL. Want to test changes before going live? Push to a dev branch and Vercel gives you a separate URL to review.
This is invaluable for client work. I can send clients a preview link before pushing to production.
Performance Benefits
Vercel isn’t just free—it’s also incredibly fast. Here’s what you get:
- Global CDN: Your site is served from servers worldwide
- Edge Network: Content delivered from the closest location to your users
- Automatic caching: Static assets are cached aggressively
- Image optimization: Automatically optimize images on-the-fly
- Compression: Automatic Brotli and Gzip compression
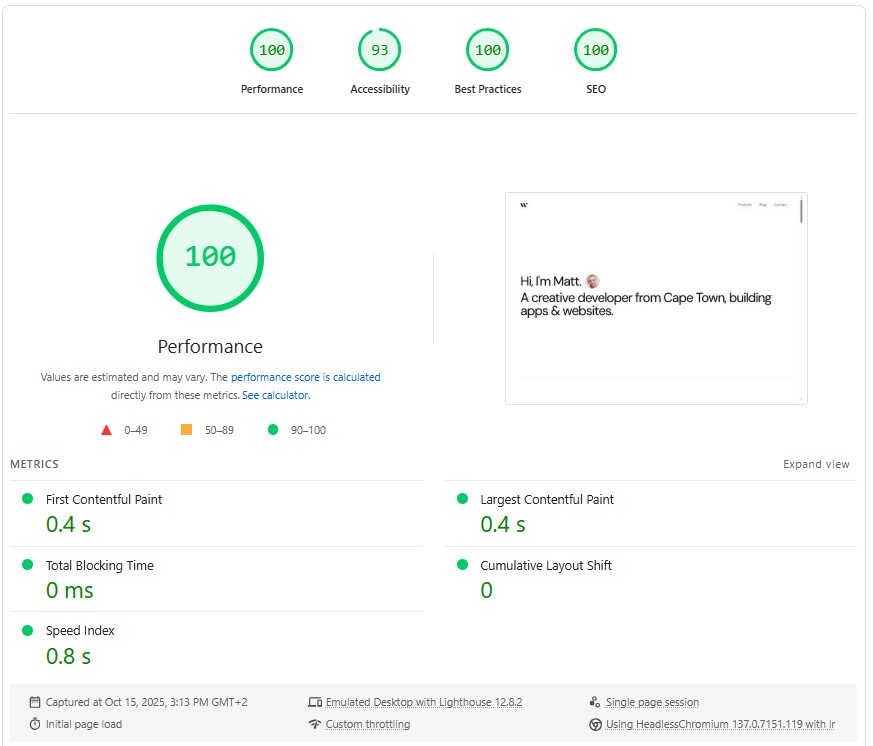
I consistently get 95+ Lighthouse scores on Vercel without any optimization effort.
 A good looking example
Limitations to Know About
Vercel’s free tier is generous, but it has limits:
- 100 GB bandwidth per month (plenty for most sites)
- 100 deployments per day
- Personal and non-commercial use (though they’re pretty lenient)
For commercial projects, their Pro plan is $20/month and removes these limits. Still way cheaper than traditional hosting.
Troubleshooting Common Issues
Build Fails
Check your build command and output directory in Vercel settings. Make sure they match your local setup.
404 on Custom Domain
DNS probably hasn’t propagated yet. Wait an hour and try again. Check your DNS records are correct.
Site Works Locally But Not on Vercel
Environment variables? API keys? Make sure they’re set in Vercel’s dashboard under Settings → Environment Variables.
Alternative Platforms
Vercel isn’t the only option. Other great free hosting platforms include:
- Netlify: Very similar to Vercel, equally good
- Cloudflare Pages: Excellent if you’re already using Cloudflare
- GitHub Pages: Great for simple static sites
- Render: Good for full-stack apps
I’ve used all of them. Vercel is my favorite for its speed and Next.js optimization, but they’re all solid choices.
Final Thoughts
Five years ago, hosting a website meant:
- Buying shared hosting ($5-10/month minimum)
- Dealing with cPanel
- Manual FTP uploads
- Slow support
- Downtime
Today, you can host professional-grade websites for free, with better performance, automatic deployments, and zero maintenance.
If you’re still paying for traditional hosting for a static site or modern framework, you’re leaving money on the table.
Set up GitHub and Vercel once, and you’ll never look back.
Want to see this setup in action? This very portfolio is hosted on Vercel using exactly the process I described above.
Happy deploying! 🚀